10 February 2022

PROJECT #1: MACRO REVISITED

DIRECTIONS:
1. Make 16+ (8+ in class/8+ out of class) macro images of texture, surfaces, small objects, etc. 
2. Develop/process images in Photoshop &/or Lightroom (the number is yet to be determined)

EXTRA CREDIT CHALLENGE OPTIONS:
  • Photo of water droplets where the background is visible THROUGH THE DROPLET.
  • Photo of the iris of an eye (human or animal) - Be careful. 


12 TIPS FOR MACRO PHOTOGRAPHY ON YOUR PHONE

WHAT IS MACRO?

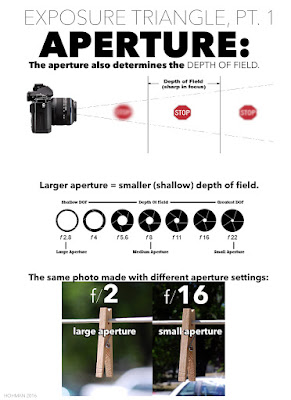
APERTURE=the opening into the camera.
APERTURE also allows you to control what is called DEPTH OF FIELD. 
DEPTH OF FIELD refers to how wide an area is in focus.  


The purple area represents what is in focus, 
and the lenses show you the aperture setting needed for THAT particular sliver of focus. 

MACRO photography refers to close-up photography.
A lot of macro photography is done with specialty lenses.
However, you can probably make them with the macro setting that is included on most cameras. 

This is the symbol that denotes close-up/macro mode on point-and-shoot cameras:


DIRECTIONS FOR DSLR CAMERAS: 
A.  If you have a DSLR, you might have a MACRO setting (the flower). If so, use that setting. If not...

1.   Set your mode to "A" for "aperture priority." 


2.  Then, set your aperture to as WIDE OPEN a setting as possible. That means, the SMALLEST f/stop number. Look at these aperture sizes in relation to the numbers below them:


Notice how the smaller number, f-1.4, is the WIDEST OPEN aperture setting.
This will give you the smallest sliver of focus possible with your lens (small/shallow depth of field).

3. If you are in Aperture Priority setting, your camera will then set the shutter speed to compensate for the wide open aperture. 

B. If you are working with a point-and-shoot camera, or a phone camera:
1. Set your camera mode to the "macro" function: 

2. If your phone does not have a macro setting, experiment with moving the a bit farther away from the subject, but zooming in a bit. It will take some adjusting, but you can get it.

EXAMPLES/INSPIRATION

Some creative macro:

07 February 2022

SPRING 2022

Welcome back, Photogs!

I am grateful you have returned.

Something about Photography (yes, capital 'P') has sparked something in you, and maybe this semester that spark will turn to flame, and a deeper appreciation of the art of Photography.
                                                                  
1. Work thoughtfully & mindfully so others may do the same.
2. Be prompt, on-time, present and remain in the studio.
3. Listen carefully and be courteous when others are talking or demonstrating.
4. Always use time productively.
5. Insure your language, comments and projects appropriately follow TuHS school handbook guidelines.
6. Demonstrate a positive approach to assignments.
7. Positively receive feedback and critique.
8. Pursue challenging solutions & strive for high standards of achievement.
9. Keep track of – and clean up – materials, and come to class prepared to work.
10. Demonstrate personal initiative and problem solving ability.
11. Actively participate intelligently in individual and group activities and 

Photography can be a centering and reassuring activity, and a great antidote for hectic times. I believe that by the end of our time together you will see the world around you in new and creative ways. 

The visual challenges I will give you will help to develop your creative self. This, alone, is valuable, and isn't about me as your teacher, but photography itself. Your journey is your own, and I am excited to help you on your way. 

I am incredibly enthused about taking you from point A to point B. Each of you comes to the class with a different starting point, and will grow/learn from there. That is inherently exciting. 
I believe you can go far. 

Do your best, and I will do mine. 
Here's to a great semester! 

Sincerely,
Mr. Hohman
📷


04 January 2022

#13-PHOTOG'S CHOICE #3 (People, Somehow)

For the last Photog's Choice of the semester, your idea is to be your own...with one caveat: you must photograph a person or people in some way.


DIRECTIONS, PART 1.

1. Search for FIVE photographers that photograph people. 

There are many links/feeds on our class sites:

http://timberwolfphotolounge.blogspot.com/

http://timberwolfphotolounge2.blogspot.com/

Also, conduct a search for 'interesting photographic portraits,' 'photographers who photograph people,' 'clever photographic portraiture,' etc. Be specific and clever with your search. If you would like to add a level of intellectual and/or societal influence, think about photographing people with 'stories.' This would allow you to get deeper into the subject, connect with your subjects, and take the project from a teacher-assigned 'thing' to something richer and meaningful within your own sensibilities...and by doing that, allow the viewer to see something in the universal humanity we all share. That old adage is true: by telling a specific story, you tell the story of all of us.  

2. Compose an email to me in Canvas.

In that email, include your a numbered list of links to FIVE photographers you find. 

Place an asterisk next to the THREE options that you see yourself being able to complete.

Under each of the asterisk links, be specific about why you are drawn to in that artist's work, what excites you about their work, and what you might like to do.


DIRECTIONS, PART 2.

1. Make ten+ portraits over a few days.

Using one or a couple of your researched photogs as a starting point, make portraits of your person/people.

The point of spreading these over a few days is to give your creative ideas and actions a chance to grow and expand as you think about what you have done.