12 October 2022

PROJECT #4: BALLOONY TUNES!


DIRECTIONS.
  1. Choose your three best sets of photos from Part #1.
  2. Choose our five best photographs of the water balloons in Part #2
  3. Develop the images.
  4. Post to your site, each with a caption that lists the shutter speed used for that particular photo.
  5. Use Adobe Bridge to read the metadata for your camera's setting.
*Can we make these be successful enough to print? 

27 September 2022

PROJECT #3: INTENTIONAL MOTION BLUR, Revisited (Shutter Priority)


DIRECTIONS.

1. Set camera to S (shutter priority) -or- Use the Slow Shutter app or shutter setting on your phone. 

2. Make 8+ well-intentioned deliberate images of intentional motion blur. 
*'Well-intentioned' means that you took time/care to consider interesting shutter speeds for your chosen subject, framed the composition of your photo well in relation to the motion blur, and then developed your photos with care and consideration in Photoshop/Lightroom

3. For at least FOUR of your subjects, photograph the subject that is moving TWICE, at different shutter speeds. We will create diptychs (like the above examples). The other images you make might be one-off motion blur images.

4. This is not a 'random photo' project. As such, the more planning you do the better. Complete this form as a planning step to get yourself organized for making these photos by Tuesday, October 4. 

  • Make a range of photos that show fast & slow shutter speeds in relation to your subject matter. 
  • Subject matter is your own choosing. 
RATIONALE.
To continue exploration and mastery of manipulating shutter speed in your camera. 

TOTAL PHOTOS
FOUR/4 one time motion blur photos
+
4 subjects, each photographed twice - equals EIGHT/8 photos
=
12 photos total

NOTE.
*Mind your ISO in relation to your shutter speed.
**Your total number of images will be 12 (since you are photographing four of your ideas twice, at different shutter speeds)

22 September 2022

PROJECT #2: Macro (Revisited)

DIRECTIONS:
1. Make 16+ (8+ in class/8+ out of class) macro images of texture, surfaces, small objects, etc. 
2. Develop/process images in Photoshop &/or Lightroom (the number is yet to be determined)
3. (Possibly?) use these as images to create wallpaper/backgrounds in your Weebly.com site. 

EXTRA CREDIT CHALLENGE OPTIONS:
  • Photo of water droplets where the background is visible THROUGH THE DROPLET.
  • Photo of the iris of an eye (human or animal) - Be careful. 


12 TIPS FOR MACRO PHOTOGRAPHY ON YOUR PHONE

WHAT IS MACRO?

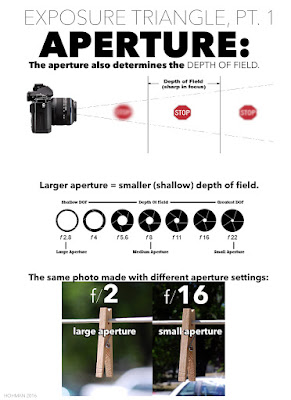
APERTURE=the opening into the camera.
APERTURE also allows you to control what is called DEPTH OF FIELD. 
DEPTH OF FIELD refers to how wide an area is in focus.  


The purple area represents what is in focus, 
and the lenses show you the aperture setting needed for THAT particular sliver of focus. 

MACRO photography refers to close-up photography.
A lot of macro photography is done with specialty lenses.
However, you can probably make them with the macro setting that is included on most cameras. 

This is the symbol that denotes close-up/macro mode on point-and-shoot cameras:


DIRECTIONS FOR DSLR CAMERAS: 
A.  If you have a DSLR, you might have a MACRO setting (the flower). If so, use that setting. If not...

1.   Set your mode to "A" for "aperture priority." 


2.  Then, set your aperture to as WIDE OPEN a setting as possible. That means, the SMALLEST f/stop number. Look at these aperture sizes in relation to the numbers below them:


Notice how the smaller number, f-1.4, is the WIDEST OPEN aperture setting.
This will give you the smallest sliver of focus possible with your lens (small/shallow depth of field).

3. If you are in Aperture Priority setting, your camera will then set the shutter speed to compensate for the wide open aperture. 

B. If you are working with a point-and-shoot camera, or a phone camera:
1. Set your camera mode to the "macro" function: 

2. If your phone does not have a macro setting, experiment with moving the a bit farther away from the subject, but zooming in a bit. It will take some adjusting, but you can get it.

EXAMPLES/INSPIRATION

Some creative macro: